数据下载
The KITTI Vision Benchmark Suite
这里以 2011_09_26_drive_0005 (0.6 GB)数据为参考,下载[synced+rectified data] [calibration] 数据。
下载完毕之后解压,然后将calibration文件解压后的结果放在如下目录下,

下载kitti2bag包
pip install kitti2bag如果后期出现如下错误:
ImportError: dynamic module does not define module export function (PyInit__tf2)
则执行如下重新安装
pip2 install kitti2bag进入到2011_09_26文件夹的同级目录中,执行如下代码进行转换:
kitti2bag -t 2011_09_26 -r 0005 raw_synced运行截图如下:

运行结束之后,会在当前目录下生成一个bag文件。

启动ROS,并进行播放
roscore进入到刚刚生成bag文件的目录下,执行如下代码:
rqt_bag kitti_2011_09_26_drive_0005_synced.bag 生成如下截图:

选择其中一个图像话题,右键,选择view -》选择image,然后点击play进行播放。
发布图片
创建工作空间,并创建功能包
~/catkin_ws/src$ catkin_create_pkg kitti_tutorial rospy
编写kitti.py代码
#!/usr/bin/env pythonimport cv2
import osimport rospy
from sensor_msgs.msg import Image
from cv_bridge import CvBridgeDATA_PATH = "/home/d501/kitti_data/2011_09_26/2011_09_26_drive_0005_sync/2011_09_26/2011_09_26_drive_0005_sync"if __name__ == "__main__":frame = 0rospy.init_node("kitti_node", anonymous=True)cam_pub = rospy.Publisher('kitti_cam', Image, queue_size=10)bridge = CvBridge()rate = rospy.Rate(10)while not rospy.is_shutdown():img = cv2.imread(os.path.join(DATA_PATH, 'image_02/data/%010d.png'%frame))cam_pub.publish(bridge.cv2_to_imgmsg(img, 'bgr8'))rospy.loginfo("camera image published")rate.sleep()frame += 1frame %= 154
添加可执行权限
sudo chmod +x kitti.py编译工作空间
~/catkin_ws$ catkin_make
~/catkin_ws$ source devel/setup.bash
在使用pycharm编写python程序时,
问题:在pycharm中使用ros时候,遇到“No module named rospy”
pycharm中无法加载rospy_pycharm no module named rospy-CSDN博客
将解释器更换为opt下的python2.7
启动rviz
rviz启动ros节点
~/catkin_ws$ rosrun kitti_tutorial kitti.py添加topic

如图所示: 
发布点云数据
修改kitti.py代码
#!/usr/bin/env python
import numpy as npimport cv2
import os
import numpy as np
import rospy
from std_msgs.msg import Header
from sensor_msgs.msg import Image, PointCloud2
import sensor_msgs.point_cloud2 as pcl2
from cv_bridge import CvBridgeDATA_PATH = "/home/d501/kitti_data/2011_09_26/2011_09_26_drive_0005_sync/2011_09_26/2011_09_26_drive_0005_sync"if __name__ == "__main__":frame = 0rospy.init_node("kitti_node", anonymous=True)cam_pub = rospy.Publisher('kitti_cam', Image, queue_size=10)pcl_pub = rospy.Publisher('kitti_point_cloud', PointCloud2, queue_size=10)bridge = CvBridge()rate = rospy.Rate(10)while not rospy.is_shutdown():img = cv2.imread(os.path.join(DATA_PATH, 'image_02/data/%010d.png'%frame))point_cloud = np.fromfile(os.path.join(DATA_PATH, 'velodyne_points/data/%010d.bin'%frame), dtype=np.float32).reshape(-1, 4)cam_pub.publish(bridge.cv2_to_imgmsg(img, 'bgr8'))header = Header()header.stamp = rospy.Time.now()header.frame_id = 'map'pcl_pub.publish(pcl2.create_cloud_xyz32(header, point_cloud[:,:3]))rospy.loginfo("published")rate.sleep()frame += 1frame %= 154
重新添加topic之后,如下:

调整size大小

将rviz存档,以后开启它就不用重新添加topic
点击File->Save Config As->选择包下的某个路径,保存为xxxx.rviz文件,下次启动时,使用rviz -d xxxx.rviz即可
添加照相机视野
重构代码data_utils.py
#!/usr/bin/env pythonimport cv2
import numpy as npdef read_camera(path):return cv2.imread(path)def read_point_cloud(path):return np.fromfile(path, dtype=np.float32).reshape(-1, 4)
publish_utils.py
#!/usr/bin/env pythonimport rospy
from geometry_msgs.msg import Point
from std_msgs.msg import Header
from sensor_msgs.msg import Image, PointCloud2
import sensor_msgs.point_cloud2 as pcl2
from cv_bridge import CvBridge
from visualization_msgs.msg import MarkerFRAME_ID = 'map'def publish_camera(cam_pub, bridge, image):cam_pub.publish(bridge.cv2_to_imgmsg(image, 'bgr8'))def publish_point_cloud(pcl_pub, point_cloud):header = Header()header.stamp = rospy.Time.now()header.frame_id = FRAME_IDpcl_pub.publish(pcl2.create_cloud_xyz32(header, point_cloud[:, :3]))def publish_ego_car(ego_car_pub):"""publish left and right 45 degree FOV lines and ego car model mesh:param ego_car_pub::return:"""marker = Marker()marker.header.frame_id = FRAME_IDmarker.header.stamp = rospy.Time.now()marker.id = 0marker.action = Marker.ADDmarker.lifetime = rospy.Duration()marker.type = Marker.LINE_STRIPmarker.color.r = 0.0marker.color.g = 1.0marker.color.b = 0.0marker.color.a = 1.0marker.scale.x = 0.2marker.points = []marker.points.append(Point(10, -10, 0))marker.points.append(Point(0, 0, 0))marker.points.append(Point(10, 10, 0))ego_car_pub.publish(marker)
kitti.py
#!/usr/bin/env python
import numpy as npimport rospyfrom data_utils import *
from publish_utils import *
import osDATA_PATH = "/home/d501/kitti_data/2011_09_26/2011_09_26_drive_0005_sync/2011_09_26/2011_09_26_drive_0005_sync"if __name__ == "__main__":frame = 0rospy.init_node("kitti_node", anonymous=True)cam_pub = rospy.Publisher('kitti_cam', Image, queue_size=10)pcl_pub = rospy.Publisher('kitti_point_cloud', PointCloud2, queue_size=10)ego_pub = rospy.Publisher('kitti_ego_car', Marker, queue_size=10)bridge = CvBridge()rate = rospy.Rate(10)while not rospy.is_shutdown():image = read_camera(os.path.join(DATA_PATH, 'image_02/data/%010d.png'%frame))point_cloud = read_point_cloud(os.path.join(DATA_PATH, 'velodyne_points/data/%010d.bin'%frame))publish_camera(cam_pub, bridge, image)publish_point_cloud(pcl_pub, point_cloud)publish_ego_car(ego_pub)rospy.loginfo("published")rate.sleep()frame += 1frame %= 154
画出汽车模型
下载汽车模型Low-Poly Car Free 3D Model - .3ds .obj .dae .blend .fbx .mtl - Free3D
 解压之后,将Car.dae文件放入到包下的某个文件夹中,这里直接使用原生解压的文件夹目录。
在publish_utils.py中添加如下代码
def publish_car_model(car_model_pub):mech_marker = Marker()mech_marker.header.frame_id = "map"mech_marker.header.stamp = rospy.Time.now()# id必须不一样,且只能是整数mech_marker.id = -1mech_marker.type = Marker.MESH_RESOURCEmech_marker.action = Marker.ADDmech_marker.lifetime = rospy.Duration()mech_marker.mesh_resource = "package://kitti_tutorials/am7f3psa0agw-Car-Model/Car-Model/Car.dae" # .dae模型文件的相对地址# 位置主要看官方提供的位置图# 因为自车的velodyne激光雷达相对于map的位置是(0,0,0),看设备安装图上velodyne的位置是(0,0,1.73),显而易见,在rviz中自车模型位置应该是(0,0,-1.73)mech_marker.pose.position.x = 0.0mech_marker.pose.position.y = 0.0mech_marker.pose.position.z = -1.73# 这边和原作者的代码不一样,因为tf结构发生了一些改变,四元数需要自己根据模型做响应的调整,笔者这边是调整好的模型四元数q = transformations.quaternion_from_euler(np.pi, np.pi, -np.pi / 2.0)mech_marker.pose.orientation.x = q[0]mech_marker.pose.orientation.y = q[1]mech_marker.pose.orientation.z = q[2]mech_marker.pose.orientation.w = q[3]mech_marker.color.r = 1.0mech_marker.color.g = 1.0mech_marker.color.b = 1.0mech_marker.color.a = 1.0 # 透明度# 设置车辆大小mech_marker.scale.x = 1.0mech_marker.scale.y = 1.0mech_marker.scale.z = 1.0car_model_pub.publish(mech_marker)
修改kitti.py代码
#!/usr/bin/env python
import numpy as npimport rospyfrom data_utils import *
from publish_utils import *
import osDATA_PATH = "/home/d501/kitti_data/2011_09_26/2011_09_26_drive_0005_sync/2011_09_26/2011_09_26_drive_0005_sync"if __name__ == "__main__":frame = 0rospy.init_node("kitti_node", anonymous=True)cam_pub = rospy.Publisher('kitti_cam', Image, queue_size=10)pcl_pub = rospy.Publisher('kitti_point_cloud', PointCloud2, queue_size=10)ego_pub = rospy.Publisher('kitti_ego_car', Marker, queue_size=10)model_pub = rospy.Publisher('kitti_car_model', Marker, queue_size=10)bridge = CvBridge()rate = rospy.Rate(10)while not rospy.is_shutdown():image = read_camera(os.path.join(DATA_PATH, 'image_02/data/%010d.png'%frame))point_cloud = read_point_cloud(os.path.join(DATA_PATH, 'velodyne_points/data/%010d.bin'%frame))publish_camera(cam_pub, bridge, image)publish_point_cloud(pcl_pub, point_cloud)publish_ego_car(ego_pub)publish_car_model(model_pub)rospy.loginfo("published")rate.sleep()frame += 1frame %= 154
重新运行之后,出现错误:
[ERROR] [1679018952.335224247]: Could not load resource [package://kitti_tutorials/meshes/Car.dae]: Unable to open file "package://kitti_tutorials/meshes/Car.dae".
[rospack] Error: package 'kitti_tutorial' not found
参考:rviz进行kitti数据集可视化时加载小车模型报错_rviz could not load resourceunable to open file-CSDN博客

使用MarkerArray进行发布
修改publish_utils.py
def publish_ego_car(ego_car_pub):"""publish left and right 45 degree FOV lines and ego car model mesh:param ego_car_pub::return:"""marker_array = MarkerArray()marker = Marker()marker.header.frame_id = FRAME_IDmarker.header.stamp = rospy.Time.now()marker.id = 0marker.action = Marker.ADDmarker.lifetime = rospy.Duration()marker.type = Marker.LINE_STRIPmarker.color.r = 0.0marker.color.g = 1.0marker.color.b = 0.0marker.color.a = 1.0marker.scale.x = 0.2marker.points = []marker.points.append(Point(10, -10, 0))marker.points.append(Point(0, 0, 0))marker.points.append(Point(10, 10, 0))marker_array.markers.append(marker)mech_marker = Marker()mech_marker.header.frame_id = "map"mech_marker.header.stamp = rospy.Time.now()mech_marker.id = -1mech_marker.type = Marker.MESH_RESOURCEmech_marker.action = Marker.ADDmech_marker.lifetime = rospy.Duration()mech_marker.mesh_resource = "package://kitti_tutorial/meshes/Car.dae"mech_marker.pose.position.x = 0.0mech_marker.pose.position.y = 0.0mech_marker.pose.position.z = -1.73q = transformations.quaternion_from_euler(np.pi, np.pi, -np.pi / 2.0)mech_marker.pose.orientation.x = q[0]mech_marker.pose.orientation.y = q[1]mech_marker.pose.orientation.z = q[2]mech_marker.pose.orientation.w = q[3]mech_marker.color.r = 1.0mech_marker.color.g = 1.0mech_marker.color.b = 1.0mech_marker.color.a = 1.0mech_marker.scale.x = 1.0mech_marker.scale.y = 1.0mech_marker.scale.z = 1.0marker_array.markers.append(mech_marker)ego_car_pub.publish(marker_array)kitti.py代码
#!/usr/bin/env python
import numpy as npimport rospyfrom data_utils import *
from publish_utils import *
import osDATA_PATH = "/home/d501/kitti_data/2011_09_26/2011_09_26_drive_0005_sync/2011_09_26/2011_09_26_drive_0005_sync"if __name__ == "__main__":frame = 0rospy.init_node("kitti_node", anonymous=True)cam_pub = rospy.Publisher('kitti_cam', Image, queue_size=10)pcl_pub = rospy.Publisher('kitti_point_cloud', PointCloud2, queue_size=10)ego_pub = rospy.Publisher('kitti_ego_car', MarkerArray, queue_size=10)bridge = CvBridge()rate = rospy.Rate(10)while not rospy.is_shutdown():image = read_camera(os.path.join(DATA_PATH, 'image_02/data/%010d.png'%frame))point_cloud = read_point_cloud(os.path.join(DATA_PATH, 'velodyne_points/data/%010d.bin'%frame))publish_camera(cam_pub, bridge, image)publish_point_cloud(pcl_pub, point_cloud)publish_ego_car(ego_pub)rospy.loginfo("published")rate.sleep()frame += 1frame %= 154
发布IMU数据
data_utils.py添加
IMU_NAME = ["lat", "lon", "alt", "roll", "pitch", "yaw", "vn", "ve", "vf", "vl", "vu", "ax", "ay", "az", "af", "al", "au", "wx", "wy", "wz", "wf", "wl", "wu", "posacc", "velacc", "navstat", "numsats", "posmode", "velmode", "orimode"]def read_imu(path):imu_data = pd.read_csv(path, header=None, sep = " ")imu_data.columns = IMU_NAMEreturn imu_datapublish_utils.py
def publish_imu(imu_pub, imu_data):imu = Imu()imu.header.frame_id = "map"imu.header.stamp = rospy.Time.now()q = transformations.quaternion_from_euler(float(imu_data.roll), float(imu_data.pitch), float(imu_data.yaw))imu.orientation.x = q[0]imu.orientation.y = q[1]imu.orientation.z = q[2]imu.orientation.w = q[3]imu.linear_acceleration.x = imu_data.afimu.linear_acceleration.y = imu_data.alimu.linear_acceleration.z = imu_data.auimu.angular_velocity.x = imu_data.wximu.angular_velocity.y = imu_data.wyimu.angular_velocity.z = imu_data.wzimu_pub.publish(imu)
kitti.py
#!/usr/bin/env python
import numpy as npimport rospyfrom data_utils import *
from publish_utils import *
import osDATA_PATH = "/home/d501/kitti_data/2011_09_26/2011_09_26_drive_0005_sync/2011_09_26/2011_09_26_drive_0005_sync"if __name__ == "__main__":frame = 0rospy.init_node("kitti_node", anonymous=True)cam_pub = rospy.Publisher('kitti_cam', Image, queue_size=10)pcl_pub = rospy.Publisher('kitti_point_cloud', PointCloud2, queue_size=10)ego_pub = rospy.Publisher('kitti_ego_car', MarkerArray, queue_size=10)imu_pub = rospy.Publisher('kitti_imu', Imu, queue_size=10)bridge = CvBridge()rate = rospy.Rate(10)while not rospy.is_shutdown():image = read_camera(os.path.join(DATA_PATH, 'image_02/data/%010d.png'%frame))point_cloud = read_point_cloud(os.path.join(DATA_PATH, 'velodyne_points/data/%010d.bin'%frame))imu_data = read_imu(os.path.join(DATA_PATH, 'oxts/data/%010d.txt'%frame))publish_camera(cam_pub, bridge, image)publish_point_cloud(pcl_pub, point_cloud)publish_ego_car(ego_pub)publish_imu(imu_pub, imu_data)rospy.loginfo("published")rate.sleep()frame += 1frame %= 154
订阅话题显示如下:

发布GPS数据
publish_utils.py添加代码
def publish_gps(gps_pub, gps_data):gps = NavSatFix()gps.header.frame_id = "map"gps.header.stamp = rospy.Time.now()gps.latitude = gps_data.latgps.longitude = gps_data.longps.altitude = gps_data.altgps_pub.publish(gps)
kitti.py代码
#!/usr/bin/env python
import numpy as npimport rospyfrom data_utils import *
from publish_utils import *
import osDATA_PATH = "/home/d501/kitti_data/2011_09_26/2011_09_26_drive_0005_sync/2011_09_26/2011_09_26_drive_0005_sync"if __name__ == "__main__":frame = 0rospy.init_node("kitti_node", anonymous=True)cam_pub = rospy.Publisher('kitti_cam', Image, queue_size=10)pcl_pub = rospy.Publisher('kitti_point_cloud', PointCloud2, queue_size=10)ego_pub = rospy.Publisher('kitti_ego_car', MarkerArray, queue_size=10)imu_pub = rospy.Publisher('kitti_imu', Imu, queue_size=10)gps_pub = rospy.Publisher('kitti_gps', NavSatFix, queue_size=10)bridge = CvBridge()rate = rospy.Rate(10)while not rospy.is_shutdown():image = read_camera(os.path.join(DATA_PATH, 'image_02/data/%010d.png'%frame))point_cloud = read_point_cloud(os.path.join(DATA_PATH, 'velodyne_points/data/%010d.bin'%frame))imu_data = read_imu(os.path.join(DATA_PATH, 'oxts/data/%010d.txt'%frame))publish_camera(cam_pub, bridge, image)publish_point_cloud(pcl_pub, point_cloud)publish_ego_car(ego_pub)publish_imu(imu_pub, imu_data)publish_gps(gps_pub, imu_data)rospy.loginfo("published")rate.sleep()frame += 1frame %= 154
画出2D检测框
参考ROS1结合自动驾驶数据集Kitti开发教程(七)下载图像标注资料并读取显示_kitti 视觉slam00/data.txt-CSDN博客
ROS1结合自动驾驶数据集Kitti开发教程(八)画出2D检测框_ros2如何在image上绘制2d包围框-CSDN博客
代码:
kitti.py
#!/usr/bin/env python
import numpy as npimport rospyfrom data_utils import *
from publish_utils import *
import osDATA_PATH = "/home/d501/kitti_data/2011_09_26/2011_09_26_drive_0005_sync/2011_09_26/2011_09_26_drive_0005_sync"if __name__ == "__main__":frame = 0rospy.init_node("kitti_node", anonymous=True)cam_pub = rospy.Publisher('kitti_cam', Image, queue_size=10)pcl_pub = rospy.Publisher('kitti_point_cloud', PointCloud2, queue_size=10)ego_pub = rospy.Publisher('kitti_ego_car', MarkerArray, queue_size=10)imu_pub = rospy.Publisher('kitti_imu', Imu, queue_size=10)gps_pub = rospy.Publisher('kitti_gps', NavSatFix, queue_size=10)bridge = CvBridge()df_tracking = read_labelfile('/home/d501//kitti_data/2011_09_26/data_tracking_label_2/training/label_02/0000.txt')rate = rospy.Rate(10)while not rospy.is_shutdown():boxes = np.array(df_tracking[df_tracking.frame==frame][['bbox_left','bbox_top','bbox_right','bbox_bottom']])types = np.array(df_tracking[df_tracking.frame==frame]['type'])image = read_camera(os.path.join(DATA_PATH, 'image_02/data/%010d.png'%frame))point_cloud = read_point_cloud(os.path.join(DATA_PATH, 'velodyne_points/data/%010d.bin'%frame))imu_data = read_imu(os.path.join(DATA_PATH, 'oxts/data/%010d.txt'%frame))publish_camera(cam_pub, bridge, image, boxes, types)publish_point_cloud(pcl_pub, point_cloud)publish_ego_car(ego_pub)publish_imu(imu_pub, imu_data)publish_gps(gps_pub, imu_data)rospy.loginfo("published")rate.sleep()frame += 1frame %= 154
data_utils.py
#!/usr/bin/env pythonimport cv2
import numpy as np
import pandas as pdIMU_NAME = ["lat", "lon", "alt", "roll", "pitch", "yaw", "vn", "ve", "vf", "vl", "vu", "ax", "ay", "az", "af", "al", "au", "wx", "wy", "wz", "wf", "wl", "wu", "posacc", "velacc", "navstat", "numsats", "posmode", "velmode", "orimode"]LABEL_NAME = ["frame", "track id", "type", "truncated", "occluded", "alpha", "bbox_left", "bbox_top", "bbox_right", "bbox_bottom", "dimensions_height", "dimensions_width", "dimensions_length", "location_x", "location_y", "location_z", "rotation_y"]def read_camera(path):return cv2.imread(path)def read_point_cloud(path):return np.fromfile(path, dtype=np.float32).reshape(-1, 4)def read_imu(path):imu_data = pd.read_csv(path, header=None, sep = " ")imu_data.columns = IMU_NAMEreturn imu_datadef read_labelfile(path):data = pd.read_csv(path, header=None, sep=" ")data.columns = LABEL_NAMEdata.loc[data.type.isin(['Van', 'Car', 'Truck']), 'type'] = 'Car'data = data[data.type.isin(['Car', 'Cyclist', 'Pedestrian'])]return data
publish_utils.py
#!/usr/bin/env python
import cv2import rospy
from geometry_msgs.msg import Point
from std_msgs.msg import Header
from sensor_msgs.msg import Image, PointCloud2, Imu, NavSatFix
import sensor_msgs.point_cloud2 as pcl2
from cv_bridge import CvBridge
from tf import transformations
from visualization_msgs.msg import Marker, MarkerArray
import numpy as np
import pandas as pd
import os
FRAME_ID = 'map'DETECTION_COLOR_DICT = {'Car': (255, 255, 0), 'Pedestrian': (0, 226, 255), 'Cyclist': (141, 40, 255)}def publish_camera(cam_pub, bridge, image, boxes, types):for type, box in zip(types, boxes):top_left = int(box[0]), int(box[1])bottom_right = int(box[2]), int(box[3])cv2.rectangle(image, top_left, bottom_right, DETECTION_COLOR_DICT[type], 2)cam_pub.publish(bridge.cv2_to_imgmsg(image, 'bgr8'))def publish_point_cloud(pcl_pub, point_cloud):header = Header()header.stamp = rospy.Time.now()header.frame_id = FRAME_IDpcl_pub.publish(pcl2.create_cloud_xyz32(header, point_cloud[:, :3]))def publish_ego_car(ego_car_pub):"""publish left and right 45 degree FOV lines and ego car model mesh:param ego_car_pub::return:"""marker_array = MarkerArray()marker = Marker()marker.header.frame_id = FRAME_IDmarker.header.stamp = rospy.Time.now()marker.id = 0marker.action = Marker.ADDmarker.lifetime = rospy.Duration()marker.type = Marker.LINE_STRIPmarker.color.r = 0.0marker.color.g = 1.0marker.color.b = 0.0marker.color.a = 1.0marker.scale.x = 0.2marker.points = []marker.points.append(Point(10, -10, 0))marker.points.append(Point(0, 0, 0))marker.points.append(Point(10, 10, 0))marker_array.markers.append(marker)mech_marker = Marker()mech_marker.header.frame_id = "map"mech_marker.header.stamp = rospy.Time.now()mech_marker.id = -1mech_marker.type = Marker.MESH_RESOURCEmech_marker.action = Marker.ADDmech_marker.lifetime = rospy.Duration()mech_marker.mesh_resource = "package://kitti_tutorial/meshes/Car.dae"mech_marker.pose.position.x = 0.0mech_marker.pose.position.y = 0.0mech_marker.pose.position.z = -1.73q = transformations.quaternion_from_euler(np.pi, np.pi, -np.pi / 2.0)mech_marker.pose.orientation.x = q[0]mech_marker.pose.orientation.y = q[1]mech_marker.pose.orientation.z = q[2]mech_marker.pose.orientation.w = q[3]mech_marker.color.r = 1.0mech_marker.color.g = 1.0mech_marker.color.b = 1.0mech_marker.color.a = 1.0mech_marker.scale.x = 1.0mech_marker.scale.y = 1.0mech_marker.scale.z = 1.0marker_array.markers.append(mech_marker)ego_car_pub.publish(marker_array)def publish_imu(imu_pub, imu_data):imu = Imu()imu.header.frame_id = "map"imu.header.stamp = rospy.Time.now()q = transformations.quaternion_from_euler(float(imu_data.roll), float(imu_data.pitch), float(imu_data.yaw))imu.orientation.x = q[0]imu.orientation.y = q[1]imu.orientation.z = q[2]imu.orientation.w = q[3]imu.linear_acceleration.x = imu_data.afimu.linear_acceleration.y = imu_data.alimu.linear_acceleration.z = imu_data.auimu.angular_velocity.x = imu_data.wximu.angular_velocity.y = imu_data.wyimu.angular_velocity.z = imu_data.wzimu_pub.publish(imu)def publish_gps(gps_pub, gps_data):gps = NavSatFix()gps.header.frame_id = "map"gps.header.stamp = rospy.Time.now()gps.latitude = gps_data.latgps.longitude = gps_data.longps.altitude = gps_data.altgps_pub.publish(gps)
结果如下:

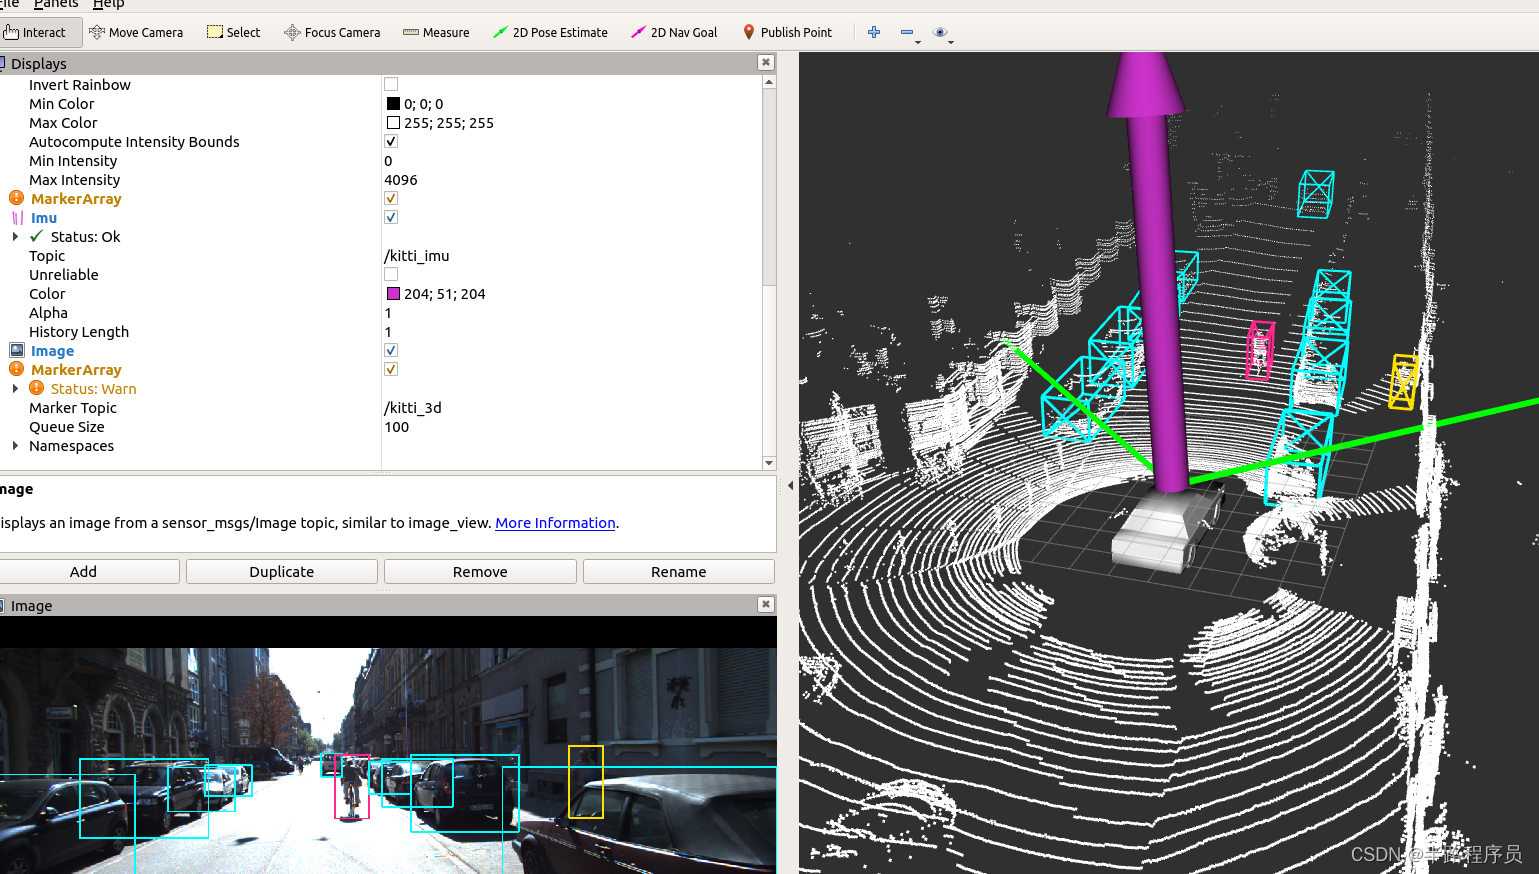
画出3D检测框
参考:ROS1结合自动驾驶数据集Kitti开发教程(九)画出3D检测框[1]_ros 画3d框-CSDN博客
下面贴出代码:
publish_utils.py
#!/usr/bin/env python
import cv2import rospy
from geometry_msgs.msg import Point
from std_msgs.msg import Header
from sensor_msgs.msg import Image, PointCloud2, Imu, NavSatFix
import sensor_msgs.point_cloud2 as pcl2
from cv_bridge import CvBridge
from tf import transformations
from visualization_msgs.msg import Marker, MarkerArray
import numpy as np
import pandas as pd
import os
FRAME_ID = 'map'DETECTION_COLOR_DICT = {'Car': (255, 255, 0), 'Pedestrian': (0, 226, 255), 'Cyclist': (141, 40, 255)}
LIFETIME = 0.1
LINES = [[0, 1], [1, 2], [2, 3], [3, 0]]  # Lower plane parallel to Z=0 plane
LINES += [[4, 5], [5, 6], [6, 7], [7, 4]]  # Upper plane parallel to Z=0 plane
LINES += [[0, 4], [1, 5], [2, 6], [3, 7]]  # Connections between upper and lower planes
LINES += [[4,1], [5,0]]def publish_camera(cam_pub, bridge, image, boxes, types):for type, box in zip(types, boxes):top_left = int(box[0]), int(box[1])bottom_right = int(box[2]), int(box[3])cv2.rectangle(image, top_left, bottom_right, DETECTION_COLOR_DICT[type], 2)cam_pub.publish(bridge.cv2_to_imgmsg(image, 'bgr8'))def publish_point_cloud(pcl_pub, point_cloud):header = Header()header.stamp = rospy.Time.now()header.frame_id = FRAME_IDpcl_pub.publish(pcl2.create_cloud_xyz32(header, point_cloud[:, :3]))def publish_ego_car(ego_car_pub):"""publish left and right 45 degree FOV lines and ego car model mesh:param ego_car_pub::return:"""marker_array = MarkerArray()marker = Marker()marker.header.frame_id = FRAME_IDmarker.header.stamp = rospy.Time.now()marker.id = 0marker.action = Marker.ADDmarker.lifetime = rospy.Duration()marker.type = Marker.LINE_STRIPmarker.color.r = 0.0marker.color.g = 1.0marker.color.b = 0.0marker.color.a = 1.0marker.scale.x = 0.2marker.points = []marker.points.append(Point(10, -10, 0))marker.points.append(Point(0, 0, 0))marker.points.append(Point(10, 10, 0))marker_array.markers.append(marker)mech_marker = Marker()mech_marker.header.frame_id = "map"mech_marker.header.stamp = rospy.Time.now()mech_marker.id = -1mech_marker.type = Marker.MESH_RESOURCEmech_marker.action = Marker.ADDmech_marker.lifetime = rospy.Duration()mech_marker.mesh_resource = "package://kitti_tutorial/meshes/Car.dae"mech_marker.pose.position.x = 0.0mech_marker.pose.position.y = 0.0mech_marker.pose.position.z = -1.73q = transformations.quaternion_from_euler(np.pi, np.pi, -np.pi / 2.0)mech_marker.pose.orientation.x = q[0]mech_marker.pose.orientation.y = q[1]mech_marker.pose.orientation.z = q[2]mech_marker.pose.orientation.w = q[3]mech_marker.color.r = 1.0mech_marker.color.g = 1.0mech_marker.color.b = 1.0mech_marker.color.a = 1.0mech_marker.scale.x = 1.0mech_marker.scale.y = 1.0mech_marker.scale.z = 1.0marker_array.markers.append(mech_marker)ego_car_pub.publish(marker_array)def publish_imu(imu_pub, imu_data):imu = Imu()imu.header.frame_id = "map"imu.header.stamp = rospy.Time.now()q = transformations.quaternion_from_euler(float(imu_data.roll), float(imu_data.pitch), float(imu_data.yaw))imu.orientation.x = q[0]imu.orientation.y = q[1]imu.orientation.z = q[2]imu.orientation.w = q[3]imu.linear_acceleration.x = imu_data.afimu.linear_acceleration.y = imu_data.alimu.linear_acceleration.z = imu_data.auimu.angular_velocity.x = imu_data.wximu.angular_velocity.y = imu_data.wyimu.angular_velocity.z = imu_data.wzimu_pub.publish(imu)def publish_gps(gps_pub, gps_data):gps = NavSatFix()gps.header.frame_id = "map"gps.header.stamp = rospy.Time.now()gps.latitude = gps_data.latgps.longitude = gps_data.longps.altitude = gps_data.altgps_pub.publish(gps)def publish_3dbox(box3d_pub, corners_3d_velos, types):marker_array = MarkerArray()for i, corners_3d_velo in enumerate(corners_3d_velos):marker = Marker()marker.header.frame_id = FRAME_IDmarker.header.stamp = rospy.Time.now()marker.id = imarker.action = Marker.ADDmarker.lifetime = rospy.Duration(LIFETIME)marker.type = Marker.LINE_LISTb, g, r = DETECTION_COLOR_DICT[types[i]]marker.color.r = r/255.0marker.color.g = g/255.0marker.color.b = b/255.0marker.color.a = 1.0marker.scale.x = 0.1marker.points = []for l in LINES:p1 = corners_3d_velo[l[0]]marker.points.append(Point(p1[0], p1[1], p1[2]))p2 = corners_3d_velo[l[1]]marker.points.append(Point(p2[0], p2[1], p2[2]))marker_array.markers.append(marker)box3d_pub.publish(marker_array)
下载calibration转换程序:kitti_util.py
kitti.py
#!/usr/bin/env python
#  -*-coding:utf8 -*-
import numpy as npimport rospyfrom data_utils import *
from publish_utils import *
from kitti_util import *
import osDATA_PATH = "/home/d501/kitti_data/2011_09_26/2011_09_26_drive_0005_sync/2011_09_26/2011_09_26_drive_0005_sync"def compute_3d_box_cam2(h, w, l, x, y, z, yaw):# 计算旋转矩阵R = np.array([[np.cos(yaw), 0, np.sin(yaw)], [0, 1, 0], [-np.sin(yaw), 0, np.cos(yaw)]])# 8个顶点的xyzx_corners = [l/2,l/2,-l/2,-l/2,l/2,l/2,-l/2,-l/2]y_corners = [0,0,0,0,-h,-h,-h,-h]z_corners = [w/2,-w/2,-w/2,w/2,w/2,-w/2,-w/2,w/2]# 旋转矩阵点乘(3,8)顶点矩阵corners_3d_cam2 = np.dot(R, np.vstack([x_corners,y_corners,z_corners]))# 加上location中心点,得出8个顶点旋转后的坐标corners_3d_cam2 += np.vstack([x,y,z])return corners_3d_cam2if __name__ == "__main__":frame = 0rospy.init_node("kitti_node", anonymous=True)cam_pub = rospy.Publisher('kitti_cam', Image, queue_size=10)pcl_pub = rospy.Publisher('kitti_point_cloud', PointCloud2, queue_size=10)ego_pub = rospy.Publisher('kitti_ego_car', MarkerArray, queue_size=10)imu_pub = rospy.Publisher('kitti_imu', Imu, queue_size=10)gps_pub = rospy.Publisher('kitti_gps', NavSatFix, queue_size=10)box3d_pub = rospy.Publisher('kitti_3d', MarkerArray, queue_size=10)bridge = CvBridge()df_tracking = read_labelfile('/home/d501//kitti_data/2011_09_26/data_tracking_label_2/training/label_02/0000.txt')calib = Calibration("/home/d501//kitti_data/2011_09_26/2011_09_26_drive_0005_sync/2011_09_26", from_video=True)rate = rospy.Rate(10)while not rospy.is_shutdown():df_tracking_frame = df_tracking[df_tracking.frame==frame]boxes_2d = np.array(df_tracking[df_tracking.frame==frame][['bbox_left','bbox_top','bbox_right','bbox_bottom']])types = np.array(df_tracking[df_tracking.frame==frame]['type'])boxes_3d = np.array(df_tracking_frame[['dimensions_height','dimensions_width','dimensions_length','location_x','location_y','location_z','rotation_y']])corners_3d_velos = []for box_3d in boxes_3d:corners_3d_cam2 = compute_3d_box_cam2(*box_3d)corners_3d_velo = calib.project_rect_to_velo(corners_3d_cam2.T)corners_3d_velos += [corners_3d_velo]image = read_camera(os.path.join(DATA_PATH, 'image_02/data/%010d.png'%frame))point_cloud = read_point_cloud(os.path.join(DATA_PATH, 'velodyne_points/data/%010d.bin'%frame))imu_data = read_imu(os.path.join(DATA_PATH, 'oxts/data/%010d.txt'%frame))publish_camera(cam_pub, bridge, image, boxes_2d, types)publish_point_cloud(pcl_pub, point_cloud)publish_ego_car(ego_pub)publish_imu(imu_pub, imu_data)publish_gps(gps_pub, imu_data)publish_3dbox(box3d_pub, corners_3d_velos, types)rospy.loginfo("published")rate.sleep()frame += 1frame %= 154
运行截图: